

Like most websites, we use own and third party cookies for analytical purposes and to show you personalised advertising or based on your browsing habits.
Generally, the information does not directly identify you, but can provide you with a more personalised web experience. Because we respect your right to privacy, you may choose not to allow us to use certain cookies. However, blocking some types of cookies may affect your experience on the site and the services we can offer.
For more information, you can read our cookie policy.
Meta Business Suite: Tutorial for Beginners
Suppose you are looking for a centralized marketing and management hub for your Instagram and Facebook business accounts. In that case, Meta Business Suite is a great place to leverage your social media accounts and streamline your marketing efforts.
You may have already heard of or seen this platform, but as Meta releases new add-ons, it can be overwhelming to understand the different elements of this tool. So today we are diving into Meta Business Suite, its components, features, and how you can use this platform for your business.
What is Meta Business Suite?
Formerly known as Facebook Business Suite, Meta Business Suite is a free social media and ads management tool for businesses to leverage their Facebook and Instagram profiles. This allows you to create and schedule content, run ad campaigns, and store assets in one place.
You may have heard of Meta’s other native social media management tool called Meta Business Manager, previously known as Facebook Business Manager. This allows you to manage assets separate from your personal profile, invite others to access your pages, and track data for Facebook and Instagram ads. However, what Business Manger lacks is the ability to switch between accounts, review all insights in one place, and access a content calendar.
This is why a lot of brands are using Business Suite as an all-in-one social media management platform. So, want to learn how to create an account and navigate the platform?
How to Create a Meta Business Suite Account
You can access Business Suite for free from both desktop and mobile platforms. To create a Business Suite account you first need to have a Facebook business account. If you haven’t created one yet, head to business.facebook.com.

Whatever content, ads, and assets you have created under Meta will appear on this platform. For example, you can see all Facebook pages, Instagram accounts, WhatsApp accounts, Facebook ads accounts.
When first entering your dashboard, your Home page will show a “To-do list” with any draft posts, top comments on your posts, a list of your most recent posts, any scheduled posts, and recommendations of who to follow.
Meta Business Suite Features
On the left-hand side of the dashboard, you will see a list of different tabs. First, at the top, you will see a drop-down menu showing your brand’s name, and which accounts you have connected. If you have any other connected accounts you can view and switch between them here.
Let’s go through each section in Business Suite:
Notifications
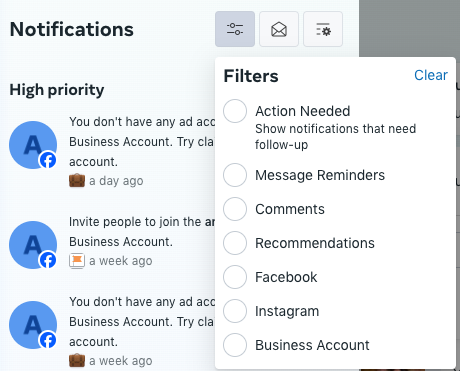
Underneath the home tab will be where all notifications appear. These are even broken up into “High priority”, “Suggestions”, and “Other notifications”. Clicking on a notification from your content will take you to the post insights, in which you have the option to export the data if desired.
At the top of the notifications tab, you will also see three different filter options. Select between different notifications, mark all messages as read, and choose your notification preferences for both your Facebook and Instagram pages. By hovering over specific notifications you can also mark these as unread.

Planner
The next tab in Business Suite is the Planner. When first entering you will see a calendar with all posted and scheduled content for the upcoming week or month. You can filter between the content by selecting the “Content type” drop-down menu, as well as where it was shared, by clicking on the “Shared to”. To schedule a new post, simply click on “Create post” or “Create reel” in the top right corner.

How to create content in Meta Business Suite
Creating new content in Business Suite is pretty straightforward, and acts as most content planner tools.
- Create post
With this, you have the option to create a story, bulk upload videos, post a video across pages, or go live. To create just a normal post, you first need to decide which platforms you will post to, Facebook, Instagram, or both. Then you will upload your content, with up to 10 images and videos. Next, you will add your caption including any hashtags, emojis, location, and tags.
Toggle on the “Customize post for Facebook and Instagram” to make each post’s caption tailored towards the platform. For Facebook only you can also create A/B testing, a direct messaging option, and a link preview.
If you want to schedule your post to go out on a specific date, toggle on the Scheduling options. Select your posts to go out at the same time, or choose different ones specifically for Facebook and Instagram. Want to see when your followers are most active? Click on the Active times option to see your ideal times to post.
On the right-hand side, you can preview your post in both your Facebook and Instagram feeds.
The last option in scheduling your post is the Privacy settings, where you can select between Public or Restricted, to choose which people can see your post. Before posting you can also toggle on Boost in case you want to quickly sponsor this post.
Finally select Finish later, which will save your post as a draft, or Schedule, and the post will appear in the calendar.
- Create reel
If you decide to create a reel instead, the posting process is similar to that of a normal post, however of course you will only be uploading one video. Add your caption, tag any collaborators, and then click Next.
Now it’s time to edit your content by adding any music, cropping your video, adding text, or enhancing the content. Once again you can preview your video for both Facebook and Instagram feeds. Once your video is edited to your liking, click on Next again.
You have the option to share the video now, schedule it for later, or save it as a draft. For Facebook only you have the option to add reel remixing, which allows others to remix and duet your Reels. Toggle on “Allow Gifts” so fans can give you gifts and Stars. Lastly, select which audience will see this, again either Public or Restricted. Then press Share for your content to go live or be scheduled.
Content
Within the content section, you will see all published, scheduled, drafted, expiring, and expired content. Filter by the post type, search by ID, and select the period of time. View analytics of each post with data such as impressions, reach, comments, shares, likes, reactions, and minutes viewed for videos. In this section you once again have the option to Boost available posts.
On the left-hand side you can also switch between different content types which include the following:
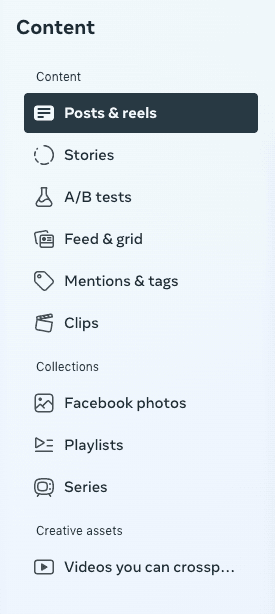
View your content’s analytics here, or head to the Insights section for advanced metrics and account overviews.
Insights
The Insights section will allow you to view an overview of your account metrics for your Facebook and Instagram accounts, as well as any paid advertising on these platforms. See the results of your content and campaigns, and even set goals to reach.
See your Current audiences’ demographical information including age, gender, top cities, and top countries. Also view your Potential audience for estimations about your audience size, age, gender, cities, and countries. These predictions can help you when creating new content and campaigns, to maximize your efforts. Within the Benchmarking section, see how you compare against your competitors and similar brands in your industry.
Dive deeper into your content and video analytics to view average reach, impressions, and top-performing posts. Also view top-performing video content, compare your page against others, view audience trends, returning viewers, and audience retention. At the bottom of this page, view any video earnings.
Inbox
View messages, comments, and replies for Instagram and Facebook in the same place. Once again you have filters to view specific messages, as well as mark them accordingly.
In the top right corner, you will also see the following buttons: Automations, Create messaging ad, Availability, and Settings. Set up inbox automations to create instant replies. Select which channel you want to set this up on, what action will trigger this instant message, and include your specific message.
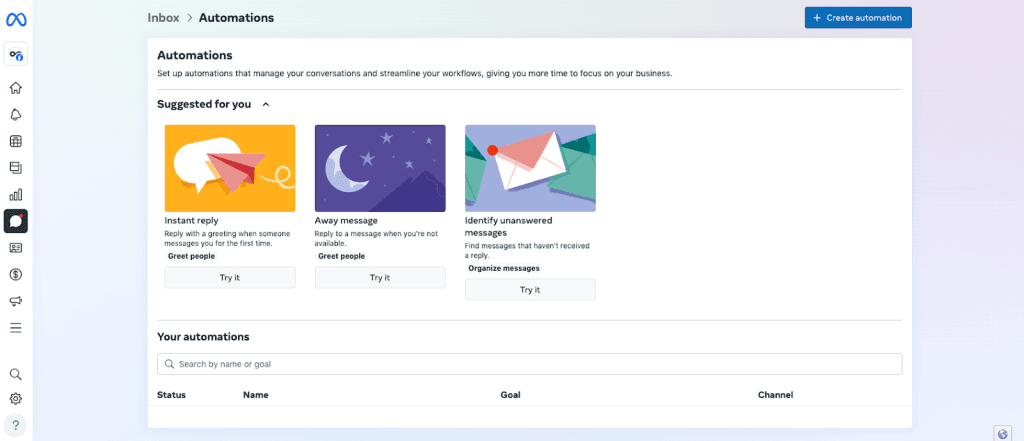
If you want to create ads via messaging, you can also do this here. Set your status to Available, or Away depending on if you want to be notified of messages. Within Settings, set up your Messanger URL, chat plugins, and receive more messages with ads.
Leads center
The Leads center generated leads from your Lead Ads campaigns. You can view this as a Pipeline view, or Table view. This will pull data about raw leads, in-progess leads, and leads you have converted. You can also create your own lead stages.
While this is a great tool, this may be more of an advanced resource that you can master with experience in Business Suite. As you build your leads contacts, you can create specific lead audiences, download data, upload leads, turn on notifications, and customize your lead funnel.
Monetization
If you have any monetized products, active subscriptions, Stars, or in-stream ads, you can view all monetization insights here. Want to learn more about monetization? Click on the Education tab to get started with monetizing your content and accounts.
Stars allow you to monetize your content when followers promote your content via Stars. In order to turn on this setting, you need to make sure your account is eligible for Stars. Viewers can leave Stars on your graming, live, photo, and text content. Facebook Stars may also be automatically turned on for public Reels, photos, and text posts.
Monetize your branded content here in this section, and view if you are eligible to add a branded content tag on your content.
Ads
View all of your active ads and insights in this section. The Ads overview tab will show you cumulative reach, post engagements, link clicks, and page likes of your advertisements in the selected time period.
See a list of your recent ads, view your audience insights, and any recommendations from the platform. You can also create a new ad by clicking on Create ad in the top right corner. Want to learn more about creating Facebook Ads? Read this guide below.
In the All ads tab, see your ads reach, results, and amount spent. You can also click on Duplicate, or View results for more in-depth insights on your campaign.
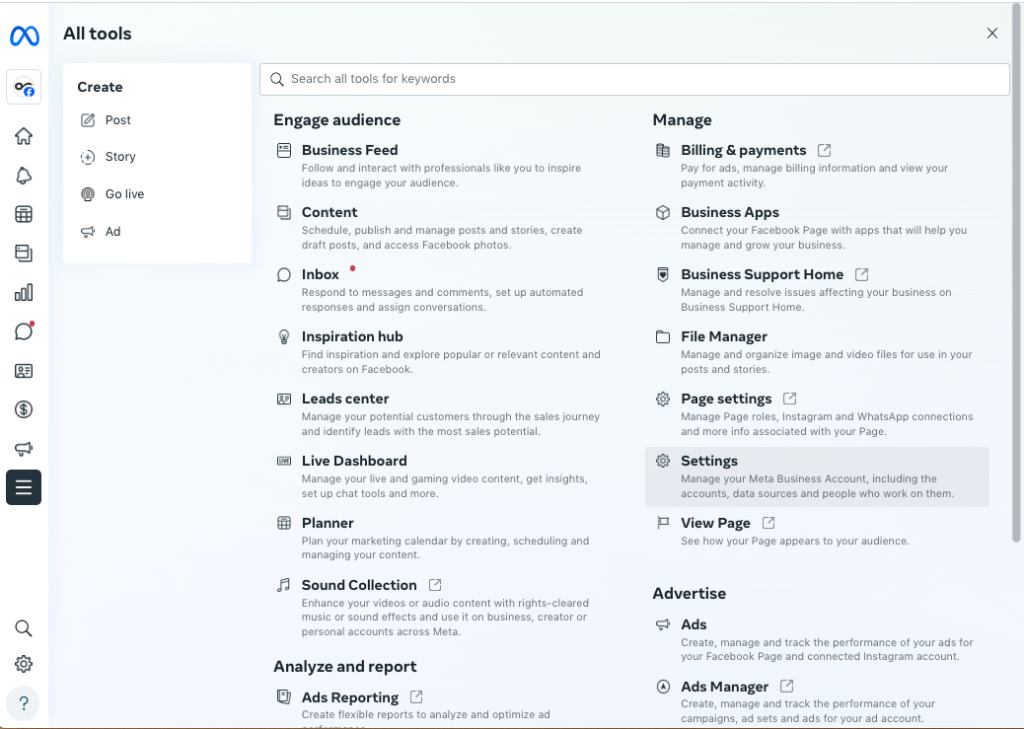
All Tools
Meta Business Suite has a large collection of tools that can help you conduct actions for just about anything. From engaging with your audience, to analyzing and creating reports, to selling, managing, and advertising. Within Meta Business Suite you have a full scope of insights and tools to manage your Facebook and Instagram accounts in one place.
Conclusions
Overall, Meta Business Suite is great option for brands and businesses wanting to grow and manage their Instagram and Facebook assets in one place. With a wide array of tools and information, you can complete all tasks in one.
However, if your brand manages platforms outside of Instagram and Facebook, Meta Business Suite is obviously limited to these channels. If you’re looking to manage all your social media accounts in one place, let me introduce you to Metricool.
You can create your FREE account and schedule content, manage your inboxes, and view analytics across your website, blog, and all social media channels. Plus, you can run ad campaigns for Facebook, Instagram, and Google in one place. It’s free, so why not give it a try.